

Authentication
Anonymous login, Google, Apple, and Facebook. What the CLI configures and what you do manually.
Implementation
Google Sign-In
On kasy new, the CLI includes Google in the scaffold (Firebase and Supabase). With a Firebase companion (push on Supabase/API, or Firebase backend), it also mints OAuth and registers credentials. Without a companion, the provider is already Enabled on Supabase Auth (like Apple); you still paste Client ID/Secret (kasy google / configure_google_login).
Firebase
kasy new runs firebase deploy --only auth, which creates the OAuth Web Client and enables Google (plus Anonymous and Email/Password) in Firebase Auth. The app authenticates directly through Firebase Auth.
On web, the CLI also:
- registers both
firebaseapp.comandweb.appOAuth redirect URIs in Google Cloud - sets
authDomaininfirebase_optionstoYOUR_PROJECT.web.app(same-origin on default Hosting; important in IDE embedded browsers)
Then verify with:
kasy doctorkasy doctor warns if the debug keystore SHA-1 is not registered on Android.
Supabase
Google login is 100% Supabase Auth. The app does not use firebase_auth. A Firebase companion is not required for Google alone.
In Quick mode the CLI asks whether you want push and whether you want Google (interactive terminal). On MCP / kasy new --yes, Google is ON by default (independent of push; use --no-google / noGoogle only for email-only):
- Push yes + Google yes: Firebase companion (free FCM) + OAuth mint + SHA-1 on the Firebase Android app + Supabase provider. You do not create an Android OAuth client by hand: Firebase + SHA-1 already wire native Sign-In.
- Push no + Google yes: scaffold includes Google. Interactive terminal asks for the Client ID/Secret paste and registers credentials on Supabase Auth. MCP /
--yes: provider Enabled at create (like Apple) + placeholders;kasy google/configure_google_loginlater for Client ID/Secret.
No companion (Console checklist): separate GCP project (org quota / billing required inside an org is a GCP rule, OAuth in Testing is free) → OAuth branding (External, press Enter on contact email) → Web client at OAuth overview → redirect https://YOUR_REF.supabase.co/auth/v1/callback → test users → copy Client ID + Secret as plain text (kasy google or MCP configure_google_login writes to Supabase automatically).
A Firebase companion also appears in Advanced with push or via kasy add notifications.
| Platform | Flow |
|---|---|
| Web | signInWithOAuth via Supabase |
| iOS / Android | google_sign_in + signInWithIdToken on Supabase |
Web (production)
Add your production domain in Supabase → Authentication → URL Configuration (Redirect URLs). For dev, kasy new already allows http://localhost:5555.
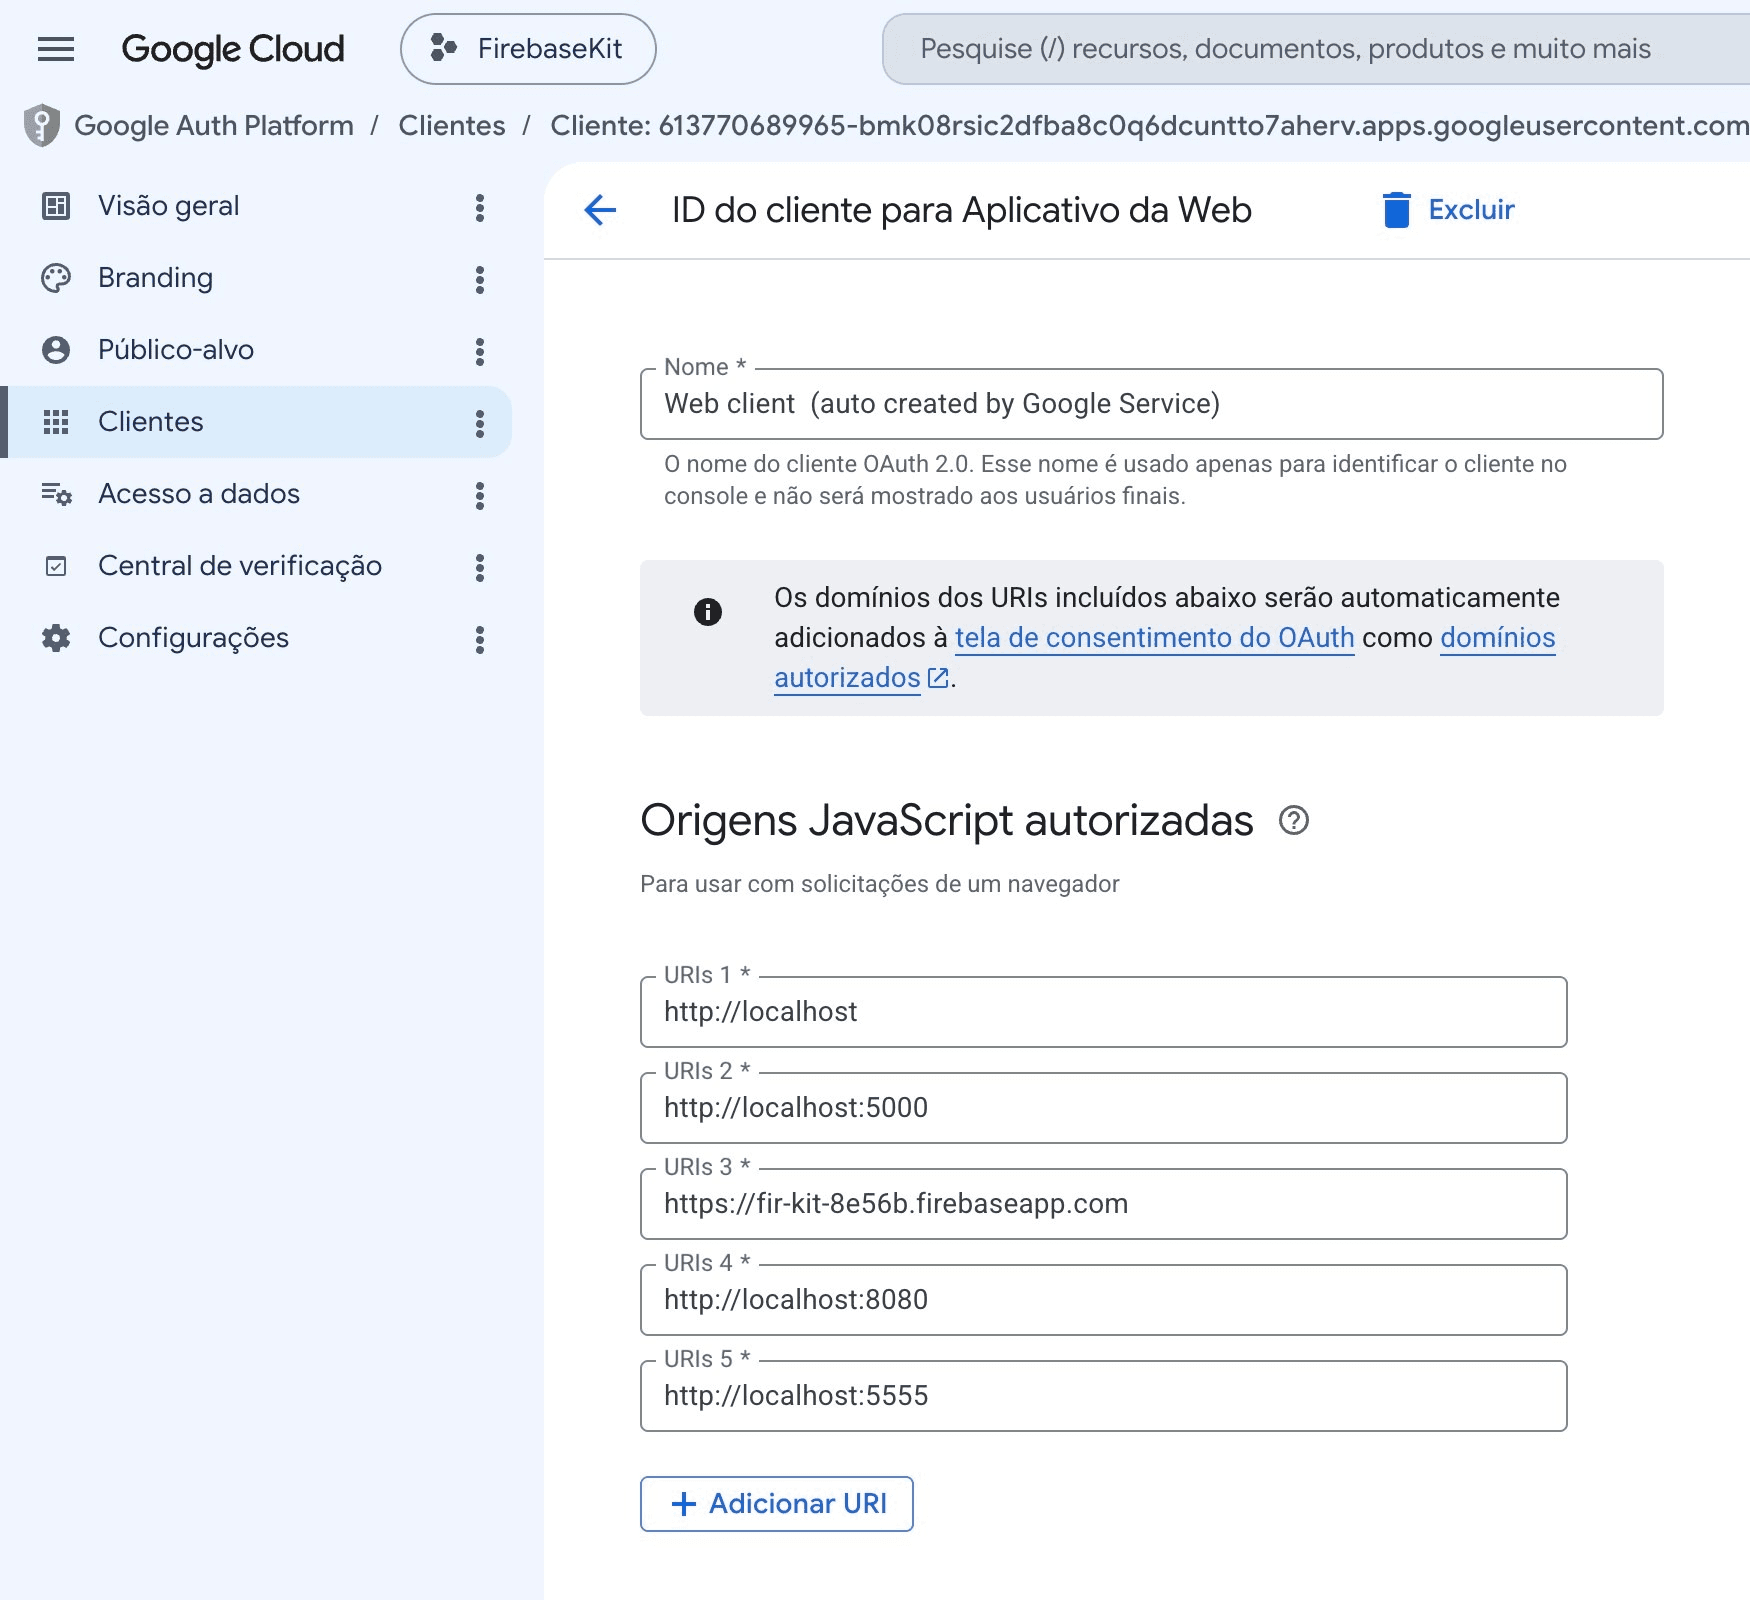
For Firebase, also add origins on the OAuth Client (Google Cloud Console → Credentials → Web client):
Apple Sign-In
Requires an Apple Developer account (paid, USD $99/year).
If your app offers social login, Sign in with Apple stops being optional. App Store review guideline 4.8 requires every app that uses a third-party login (Google, Facebook, X, LinkedIn) to set up the primary account to also offer an equivalent login service that limits data collection to name and email, lets users keep their email private, and does not collect interactions for advertising. Sign in with Apple meets all three.
Having email and password does not exempt you: the guideline's exception only covers apps that use exclusively their own account system. Since the kit already ships Google, the rule applies. Submitting without the Apple button usually comes back as a rejection.
It does not apply to education/enterprise apps with corporate accounts, government digital identity, or clients for one specific third-party service.
1. Enable the capability on your Bundle ID
- Open Identifiers
- Select your Bundle ID
- Enable Sign In with Apple → Enable as a primary App ID → Save
2. Create the key
- Open Keys
- Click + → give it a name (e.g.,
Firebase Sign In with Apple) - Enable Sign In with Apple → Configure → select your Bundle ID → Save
- Register → download the
.p8(you can only download it once, keep it somewhere safe) - Note the Key ID (e.g.,
6RR89XG535)
3. Create or edit the Services ID (web)
Apple Sign-In on the web uses a Services ID (com.company.app.signin), not the iOS App ID (com.company.app).
- Open Identifiers or Services IDs
- Filter: the page defaults to App IDs. Switch the top-right dropdown to Services IDs
- If missing: + → Services IDs → Continue
- Description:
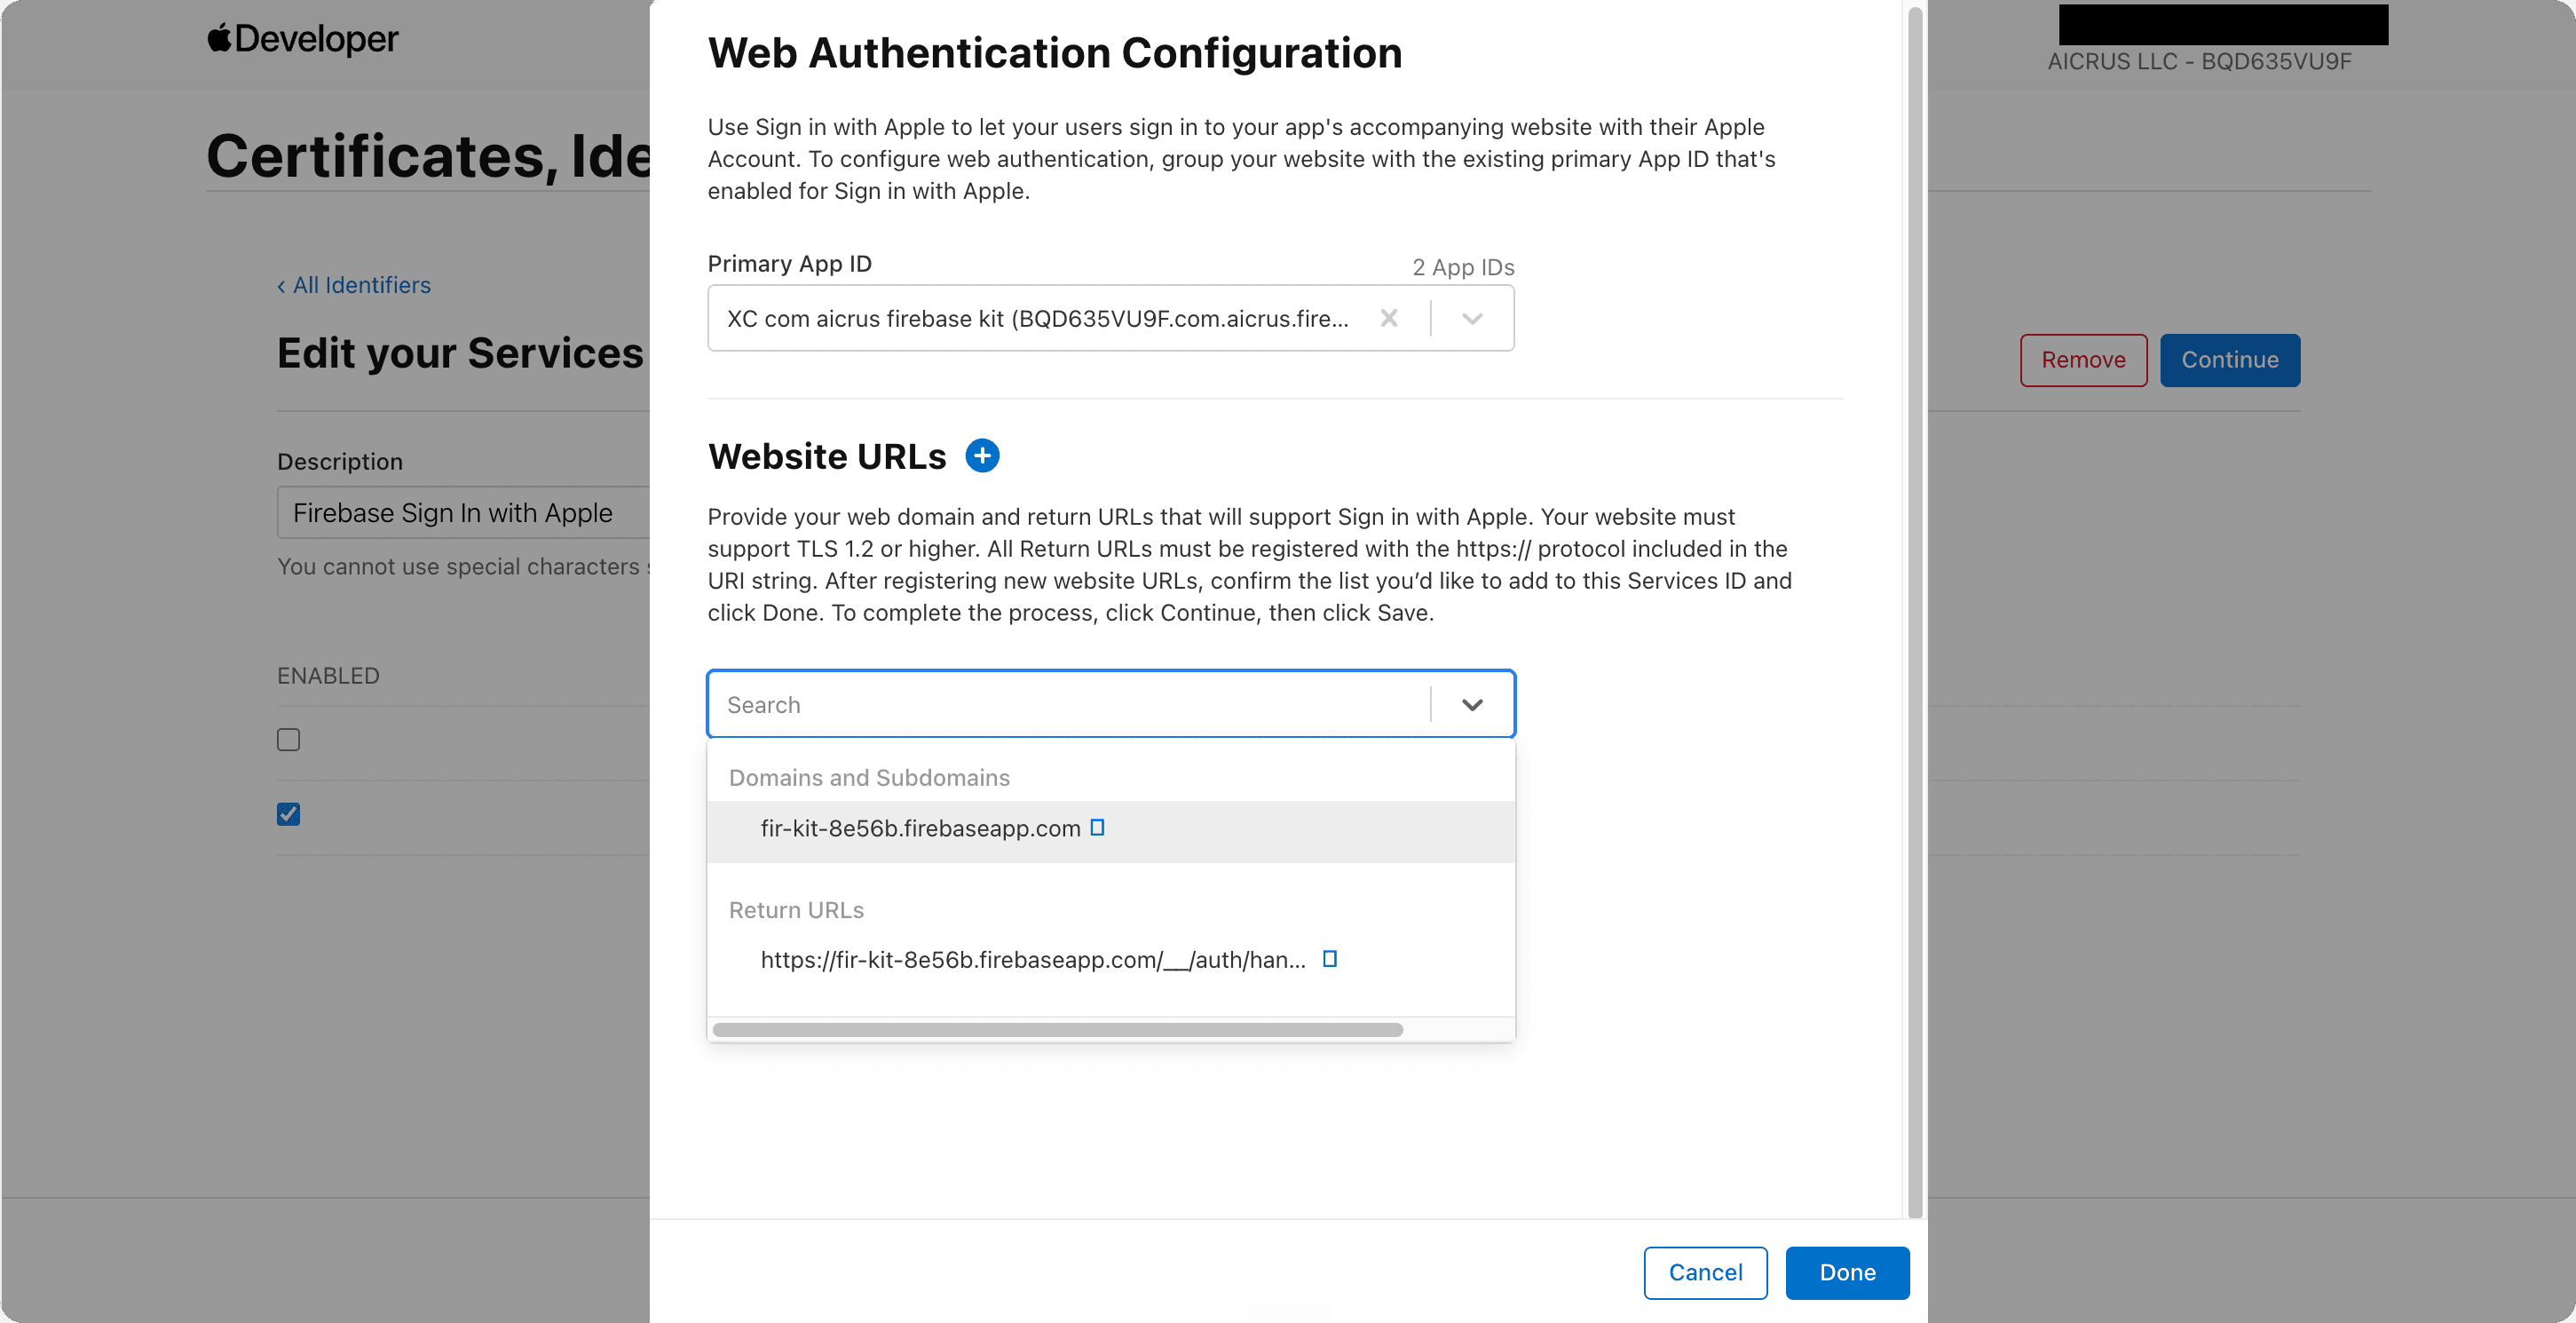
Firebase Sign In with Apple· Identifier:YOUR_BUNDLE_ID.signin - Register → open the Services ID → Sign In with Apple → Configure → Primary App ID: your Bundle ID
Domains and Return URLs (comma on one line):
| Backend | Domains | Return URLs |
|---|---|---|
| Firebase | YOUR_PROJECT.firebaseapp.com, YOUR_PROJECT.web.app | https://YOUR_PROJECT.firebaseapp.com/__/auth/handler, https://YOUR_PROJECT.web.app/__/auth/handler |
| Supabase | YOUR_PROJECT_REF.supabase.co | https://YOUR_PROJECT_REF.supabase.co/auth/v1/callback |
The Apple portal expects comma on one line, not one entry per line. Separate lines trigger One or more domains are invalid and a gray Next button.
- Next → Done → Continue → Save
4. Configure it in Firebase
- Open Firebase Console → Authentication → Apple
- Enable the Apple provider
- Fill in under OAuth code flow configuration:
- Services ID: the identifier from step 3 (e.g.,
com.company.app.signin) - Team ID: found in Membership Details
- Key ID: the Key ID from step 2
- Private key: the full content of the
.p8(including the-----BEGIN PRIVATE KEY-----and-----END PRIVATE KEY-----lines)
- Services ID: the identifier from step 3 (e.g.,
- Save
5. Enable the capability in Xcode
- Open
ios/Runner.xcworkspacein Xcode - Target Runner → Signing & Capabilities → + Capability → add Sign In with Apple
iOS / macOS: the Apple button appears automatically after the steps above.
Android: the Apple button is hidden by default (Apple doesn't offer native Android login for typical SaaS apps).
On web the button shows per device, not per browser. The kit reads the user agent: iPhone, iPad and Mac show the Apple button in any browser (Safari, Chrome, Firefox). Android, Windows and Linux do not, by design.
The side effect: a user who switches devices gets locked out. Someone who created their account with Sign in with Apple on an iPhone and later opens the app (or the site) on Android will not find the button anywhere, and there is no "forgot password" for a social account.
If your app ships to both stores, make a conscious call: either warn on the login screen that the account only works from an Apple device, or offer a second method (email) at signup so the user has a way back in.
Web (Firebase): after steps 1 to 4, run kasy apple-web, or, via MCP, ask your assistant to set up Apple Sign In on the web (configure_apple_web). It writes the Services ID, Team ID, Key ID, and .p8 into Firebase's Apple provider and turns on withAppleWebSignin in the app. The Services ID needs both domains and both Return URLs (firebaseapp.com and web.app).
Web (Supabase): same Apple Developer steps 1 to 3, but the Services ID Return URL is https://YOUR_PROJECT.supabase.co/auth/v1/callback (domain YOUR_PROJECT.supabase.co, not Firebase Hosting). Then run kasy apple-web to sign the secret and store it in Supabase (expires ~6 months).
Facebook Sign-In
Requires an account on Meta for Developers.
Shortcut: after creating and configuring the app on Meta (steps 1 to 5), run kasy facebook, or, via MCP, ask "set up Facebook Login" (tool configure_facebook_login). It writes the credentials into Info.plist, strings.xml, and Firebase/Supabase automatically. See Kasy MCP.
1. Create the app on Meta
- Open Meta for Developers → My Apps
- Click Create App → select Consumer → Next
- Fill in the app name → Create App
- In the app dashboard, note the App ID and the Client Token (Settings → Advanced → Client Token)
2. Enable Facebook Login
- In the Meta app dashboard → Add Product → Facebook Login → Set Up → iOS and/or Android
- iOS: provide your app's Bundle ID
3. iOS: update Info.plist
Edit ios/Runner/Info.plist and replace the placeholders:
<key>FacebookAppID</key>
<string>YOUR_APP_ID</string>
<key>FacebookClientToken</key>
<string>YOUR_CLIENT_TOKEN</string>
<key>FacebookDisplayName</key>
<string>Your app's name</string>
And the URL scheme (inside CFBundleURLTypes):
<string>fbYOUR_APP_ID</string>4. Android: update strings.xml
Edit android/app/src/main/res/values/strings.xml and replace the placeholders:
<string name="facebook_app_id">YOUR_APP_ID</string>
<string name="facebook_client_token">YOUR_CLIENT_TOKEN</string>
5. Web: add the domain in Meta
- In the Meta app dashboard → Facebook Login → Settings
- Under Valid OAuth Redirect URIs, add:
- Firebase backend (both):
https://YOUR_PROJECT.firebaseapp.com/__/auth/handlerhttps://YOUR_PROJECT.web.app/__/auth/handler
- Supabase backend:
https://YOUR_PROJECT.supabase.co/auth/v1/callback
- Firebase backend (both):
- Under Allowed Domains for the JavaScript SDK, add your app domains (
firebaseapp.comandweb.appon Firebase; your web host on Supabase)
Then run kasy facebook to apply it automatically, or run kasy doctor to verify.
Information
How login works in the app
Mobile (default): anonymous account
When the app opens on native, an anonymous account is created automatically. The user lands straight on Home. Later they can link an email or social account in Settings, without losing data.
App opens → anonymous account → onboarding → Home
User wants a real account → /signin → links to the existing anonymous account
Firebase: requires the Anonymous provider active in Firebase Auth and kasy deploy before the first boot.
Supabase: kasy new enables anonymous automatically in config.toml (enable_anonymous_sign_ins = true). Nothing to do in the dashboard.
Supabase (dashboard): on Authentication → Users, the search dropdown may be set to Email address. Anonymous users have no email and vanish from the list. Use Unified search or search by User ID copied from public.users. See Troubleshooting → Anonymous in Auth.
REST API: doesn't support anonymous natively. Change authenticationMode to authRequired in lib/environments.dart (recommended) or implement POST /auth/guest on your server.
Web
No anonymous login. The flow goes straight to /signin:
App opens → /signin → login or sign up → HomeChanging the mode
In lib/environments.dart:
authenticationMode: AuthenticationMode.anonymous,  // default
// or
authenticationMode: AuthenticationMode.authRequired,| Mode | Behavior |
|---|---|
anonymous | Account created on open. Data preserved when linking |
authRequired | No account until the user logs in |
What a user without an account can do
This applies to both the anonymous user (anonymous) and the guest (authRequired): no screen slams the door on them, and anything that needs an account is ignored silently, with no crash.
| Area | User without an account |
|---|---|
| Onboarding | Full, same as someone with an account |
| Home | Accessible |
| Notifications | Screen opens, list is empty |
| Feedback and votes | Sees the list; the vote is ignored |
| Subscription | The paywall opens; the purchase asks for login in the next step |
| Avatar and upload | The screen opens; the upload is ignored |
| ATT permission (iOS) | Opens and moves on; RevenueCat and Facebook don't initialize |
| Any database write | Silently ignored |
The "Continue without account" button on the sign-in screen goes back Home on native; on the web it marks locally that the auth step is done and enters Home.
Protecting a screen
final user = ref.watch(userStateNotifierProvider).user;
if (user.idOrNull == null) {
  context.push('/signin');
  return;
}
Supabase: where to register the credentials
For projects with a Supabase backend, the steps on Apple and Meta are identical. What changes is where you register the credentials:
| Provider | Where to configure |
|---|---|
| Supabase Dashboard → Auth → Providers → Google | |
| Apple | Supabase Dashboard → Auth → Providers → Apple (Services ID required) |
| Supabase Dashboard → Auth → Providers → Facebook |
With Apple on Supabase, the Services ID's Return URL must be:
https://YOUR_PROJECT.supabase.co/auth/v1/callbackSocial login: links to the anonymous account
On mobile, social login links to the existing anonymous account: the UID and all the user's data are preserved. Same interface across all three backends.
Email/password sign-up: also links
It's not just social login. Signing up with email and password from the anonymous state also links to the existing account (doesn't create a separate one), same UID, same data preserved. Firebase and Supabase already do this automatically.
REST API: linking depends on how you implement POST /auth/signup on your server, this backend has no native concept of an anonymous account, so "linking" is your own API's responsibility.
Last updated on 08/23/2026